
Laplink® PCmover® Professional
User Guide
The only software that moves your applications, files, and settings – Now with Laplink AI Assistant!
Support – PCmover FREE Transfer Assistance
Laplink AI Assistant
PCmover Professional now includes Laplink AI Assistant! PCmover Help in AI Assistant is available to answer any PCmover-related questions about setting up a transfer. Additionally, you can customize your transfer using the Transfer Plan part of AI Assistant, which allows you to make explicit requests regarding the transfer or exclusion of users, applications, or file types. Click AI Assistant on any PCmover screen to access PCmover Help.
Glossary
Old PC/Source PC: The source PC is the “old” PC that contains the applications, files, and settings that you wish to move to the destination, or “new” PC.
New PC/Destination PC: The “new” PC is the PC to which the applications, files, and settings are moved.
Transfer: The process of copying your selected applications, files, and settings from your “old” PC to your “new” PC.
Additional Transfer Options
- PCmover Image & Drive Assistant With PCmover Image & Drive Assistant, you can restore the programs, files and settings from an image or an old hard drive, even if the image is from an earlier version of Windows.
- File Based Transfer: Transfer to the new PC by creating a Transfer File which is stored on an internal drive or on external media, such as an external hard drive.
- PCmover Profile Migrator: Transfer files, settings, and user-specific applications between two user profiles on the same PC. PCmover supports transfers for Azure Active Directory users, local Active Directory users, and local non-domain users.
- PCmover Profile Migrator: Transfer files, settings, and user-specific applications between two user profiles on the same PC. PCmover supports transfers for Azure Active Directory users, local Active Directory users, and local non-domain users.
To use one of these transfer options, click Advanced Options on the Welcome screen and follow the on- screen prompts. See additional instructions in the Welcome to PCmover step.
Pre-Installation Checklist (both PCs)
System requirements for each PC:
- CPU: Same as required by operating system.
- RAM: Same as minimum required by operating system.
- Available hard disk space: 200 MB.
- Windows 11/10/8.1/8/7 SP1 64-bit
For 32-bit OS, please contact Customer Service for a special version compatible with 32-bit.
Customer Service: https://contact.laplink.com
PCmover does not support full server restorations, such as is found on Windows Server 2003 and Server 2008. It will execute on these operating systems and can be used to restore accounts and applications. However, it will not properly restore any of the systems services and settings such as the Domain Name Service or Terminal Licensing.
- The operating system on the new PC must be the same as or newer than the operating system on the old PC.
- All Windows Important Updates must be applied to the NEW PC. To open Windows Update:
- Windows 11 and Windows 10: From Windows Search (‘Search the Web and Windows’), type ‘Windows Update’ and Enter. Click Check for Update.
- Windows 8: Press the Windows key + X. In the menu that appears, click Control Panel. Then, click System and Security and click Windows Update. In the left pane, click Check for updates and choose to install all Important Updates.Do not plug in the Laplink USB cable or Laplink Ethernet cable until directed to do so later in this user guide.
IMPORTANT: When you purchase PCmover Professional, you are purchasing a license that limits you to transferring the contents from one (1) old PC to one (1) new PC. For complete details, refer to the End User License Agreement (EULA).
Installing PCmover (both PCs)
To install PCmover from a downloaded file, follow these steps on each PC:
- Download PCmover Professional from: https://dl.laplink.com/ml/pro
- Double-click on the PCmover EXE file in the folder where the file was saved. Follow the on- screen prompts. You may see the User Account Control dialog. If so, click Yes to allow “Setup Launcher” to run, which will start the PCmover installation.
- Repeat these instructions on the second PC.
- Repeat these steps on the second PC.
Pre-Transfer Checklist (both PCs)
The following items should be addressed and/or completed on both of your PCs before starting PCmover.
- PCmover Installation: PCmover has been installed on both PCs.
- Administrator-level Permissions: On some operating systems, you will need Administrator-level permissions to perform a transfer.
- Hard Disk Space (Old PC vs. New PC): The hard drive(s) on the new computer has as much or more disk space as that on the old computer.
- Windows Versions (Old vs. New): The new PC has the same Windows version as or newer Windows version than that installed on the old PC.
- Internet Explorer Versions (Old vs. New): The new PC should have the same or newer version of Internet Explorer as that installed on the old PC.
- Review Applications on Each PC: You should not try to transfer applications that already appear on both PCs.
Example: Assume Microsoft Office is installed on the old PC and on the new PC. You should not attempt to transfer the Microsoft Office application, although transferring Office documents is fine.
IMPORTANT: Trial versions of applications (including Microsoft Office) should always be uninstalled from the new PC before transferring a full version of the same application from the old PC.
-
Network Domain PCs: Corporate PCs on a network domain should be connected and logged into the domain at least once prior to the transfer.
-
Computer Cleanup: Laplink recommends that you run ScanDisk or a similar disk checking utility, as well as antivirus and antispyware software on the old and the new computers before the transfer.
-
PC Power Settings/Options: Screen savers, hibernation protocols, and power-saving options on both computers should be turned OFF (i.e. All power management options in the Control Panel should be set to “Never” so they are completely disabled). Both computers need to remain on and completely “awake” during the transfer and must not go into screensaver or sleep/hibernation mode.
A laptop PC must be plugged into a power outlet, rather than running on its batteries, as the transfer is likely to take a longer time than the battery life.
-
Exit All Programs: Exit all programs that are running on both computers. Turn off system tools such as virus scanners, spyware scanners, firewall software, and desktop search utilities on both PCs. Due to the nature of these types of applications, you should choose not to transfer them, as they are unlikely to transfer correctly.
Transfer Information
-
Length of Time: The transfer may take quite a while, depending on several factors: the size of the hard drive(s) you are transferring, the amount of data on them, their level of fragmentation, the number and size of applications and other files and folders you are transferring, and other factors.
-
Updates for Applications: Some older applications may not work correctly after transfer without an update, especially if the operating system on the new PC is a more recent one than on the old. If you find this to be the case, please check with the application’s manufacturer for an update.
IMPORTANT: Some applications with a copy-protection process known as Digital Rights Management may not function correctly after the transfer. These will probably require reactivation on the new PC, possibly a Repair done through the Windows Control Panel, and possibly reinstallation. Certain other applications, such as Microsoft Office, may also require reactivation.
Old PC and New PC: Validate Serial Number and Connect
IMPORTANT: The sections ‘PCmover Pre-Transfer Checklist’ and ‘Transfer Information’ should be reviewed and completed before beginning a PCmover transfer.
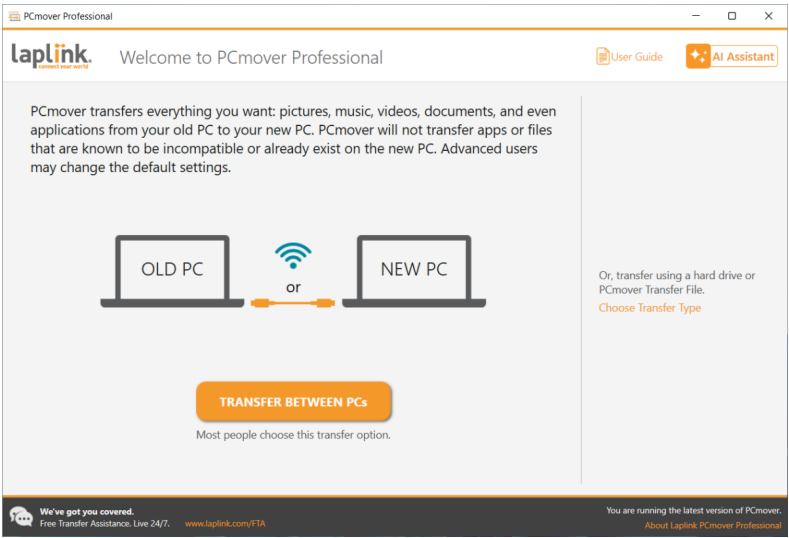
- i. If PCmover is not already running, start PCmover on your Old PC.
Note: If you see a Windows Security Alert (User Account Control dialog), select ‘Unblock’ or ‘Yes’ to proceed with running PCmover. The Security Alert is a standard Windows message that appears when starting most programs on your PC.
- ii. If you see the notice about a new version of PCmover, click the link to get the latest version of PCmover. You will be taken to a Web page from which you can download the updated version, as well as the latest guide.
IMPORTANT: If a new version is available, please install the new version on BOTH computers immediately.
- iii. Old PC to New PC Transfer: If you are transferring from your old PC to your new PC, click Transfer Between PCs, and go to step 2.
Helpful Tip: To access Laplink AI Assistant, click AI Assistant on any PCmover screen. The AI Assistant can answer any PCmover-related questions about setting up a transfer.
Note: If the ‘Transfer Between PCs’ button stays gray and you see an error, please follow the steps in the Troubleshooting point “Welcome Screen – Unable to Advance”.
Note: The steps in the remainder of this guide, beyond this “Additional Transfer Options” section, are for those transferring from an old PC to a new PC via a network or Laplink cable. When creating a Transfer File, using PCmover Image & Drive Assistant, or transferring between user profiles with PCmover Profile Migrator, the screens you see and the order they are shown in will be different. Follow the instructions in this section below and the on-screen instructions.
- File Based Transfer: Transfer to the new PC by creating a Transfer File which is stored on an internal drive or on external media, such as an external hard drive.
- Click Advanced Options on the Welcome screen, choose File Based Transfer and click Next.
- Follow the on-screen prompts to create the Transfer File and save it to external media.
- To customize what is transferred from the old PC, such as selecting applications, user accounts, and drives, click Customize Transfer File. See the Choose What to Transfer and Transfer Summary steps in this guide for more details on what you can select.
- When prompted, start PCmover on your new PC. Follow the screens to unload the Transfer File on your new PC and complete the transfer.
- PCmover Image & Drive Assistant: With PCmover Image & Drive Assistant, you can restore the programs, files and settings from an image or an old hard drive, even if the image is from an earlier version of Windows.
- Prior to using PCmover, mount the disk image of your old computer or connect your hard drive directly to your new PC.
- Click Advanced Options on the Welcome screen, choose Image & Drive Assistant and click Next.
- Follow the on-screen prompts to set up the restore.
- To customize what is restored from the disk image or hard drive, such as selecting applications, user accounts, and drives, click Choose What to Transfer. See the Choose What to Transfer and Transfer Summary steps in this guide for more details on what you can select.
- Continue following the wizard screens to complete the restore.
- PCmover Profile Migrator: Transfer files, settings, and user-specific applications between two user profiles on the same PC. PCmover supports transfers for Azure Active Directory users, local Active Directory users, and local non-domain users.
- Click Advanced Options on the Welcome screen, choose Profile Migrator and click Next.
- Follow the on-screen prompts to set up the transfer between user profiles
2. Validate Serial Number
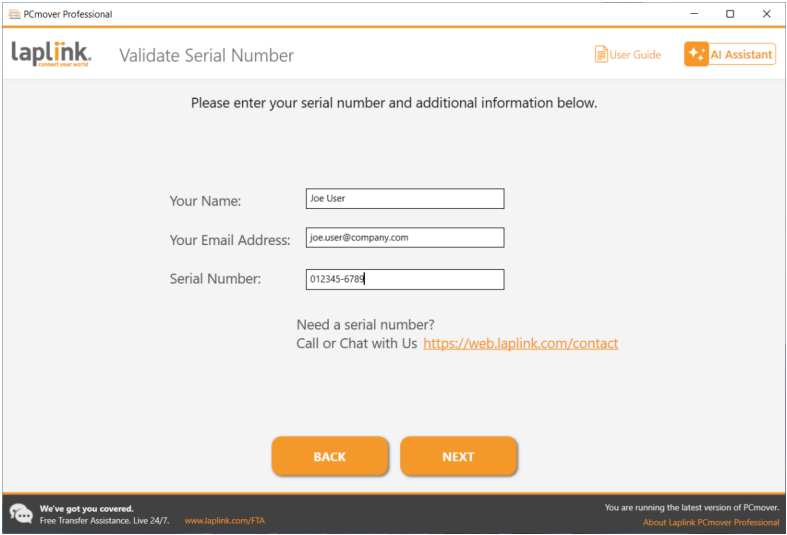
Enter your name, email address, and serial number, and click Next.
Serial Number: The location of your serial number depends on how you purchased PCmover.
- Download: When you purchased the product, you should have received a confirmation email containing your serial number. If you no longer have the email message, visit the “My Downloads” page of your Laplink Support Account at:
Once there, enter the email address you supplied when you purchased the product. If you have forgotten your password, please enter your email address and click on the Forgot Your Password link.
- CD: Affixed to the CD sleeve.
3. Run PCmover on Both PCs
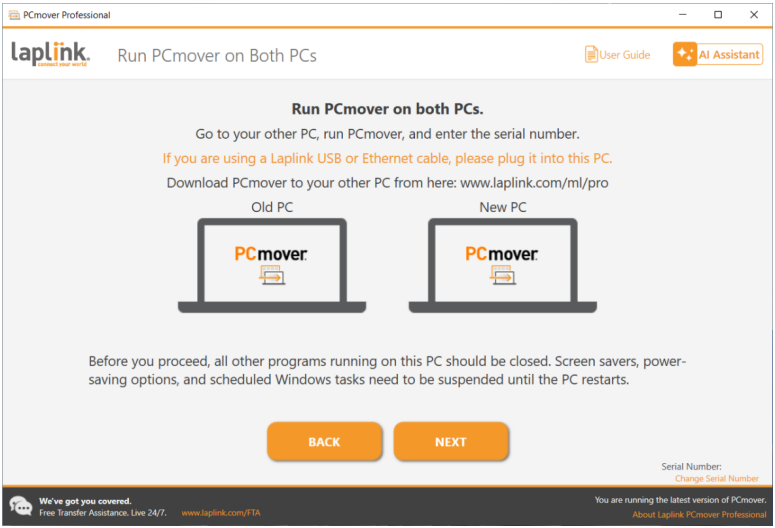
Go to your New PC and follow the previous steps one and two on your New PC.
Once you see the Run PCmover on Both PCs screen on your New PC, go to step four.
Note: Do not click ‘Next’ on either PC until step four has been completed.
4. Connect Your Old and New PCs
Choose which method you will use to connect your Old and New PCs for the transfer. Laplink recommends using a WiFi or Wired Network if available. Network connections in PCmover support SSL.
- WiFi or Wired Network: Both your Old and New PCs must be on the same WiFi or Wired Network. Click Next on both your Old and New PCs on the Run PCmover on Both PCs screens.
- Laplink Ethernet Cable or Laplink USB Cable: Plug the Laplink cable into the respective Ethernet or USB ports on both your Old and New PCs. Click Next on both your Old and New PCs on the Run PCmover on Both PCs screens.
Note: If the New Hardware Detected Wizard is displayed when you plug in the USB cable on Windows XP, select “No, not this time” and click ‘Next’.
If you see the dialog window stating that ”Connection with a USB cable cannot be detected”, please verify that the cable is plugged in to both PCs.
5. Old PC: Find Other PC
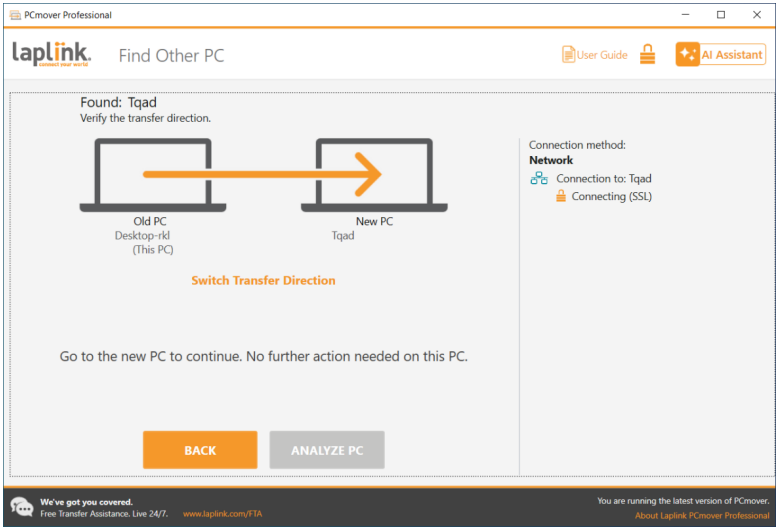
Your Old PC and New PC are connected if you see the names of both PCs listed on the Find Other PC screen on your Old PC.
Note: If you don’t see both PCs listed, click ‘Scan Again’ on your Old PC. You may see a dialog with the name of your New PC. If so, select the PC and click ‘OK’.
Once your Old and New PCs are connected, setup on the Old PC is complete. Go to the New PC and continue to the next section to finish setting up the transfer.
New PC: Set Up Transfer 1. Find Other PC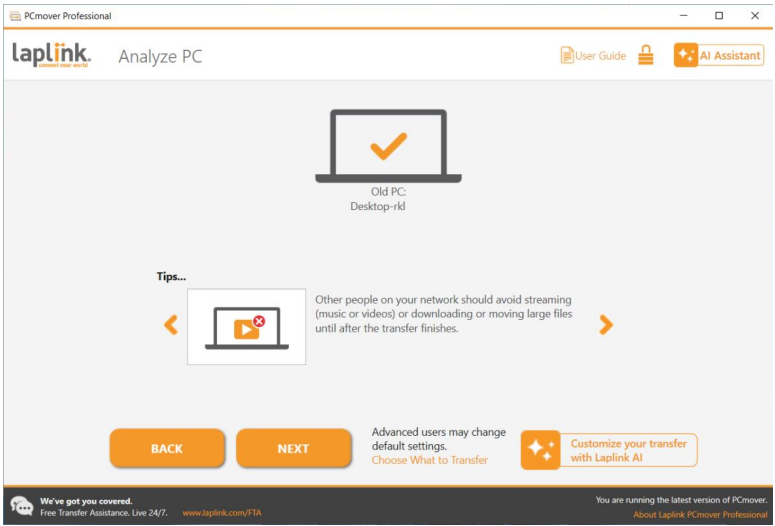
On the New PC, click Analyze PC.
When analysis is complete, decide what you want to transfer to your new PC:
- Choose What to Transfer: If you want to transfer only some applications, files, and settings to the new PC, click the text link Choose What to Transfer, and continue to step two.
Helpful Tip: You can also customize your transfer using the Transfer Plan part of Laplink AI Assistant, which allows you to make explicit requests regarding the transfer or exclusion of users, applications, or file types. Click Customize Your Transfer with Laplink AI. Type in the lower text box how you wish to customize the transfer. The AI Assistant will respond with proposed changes. Review the changes and click Accept if you want to proceed with the transfer customizations.
- Transfer Everything: If you want to transfer all applications, files, and settings to your new PC, click Next. Skipping step two and three, go to step four to finalize setup and start the transfer.
2. Choose What to Transfer
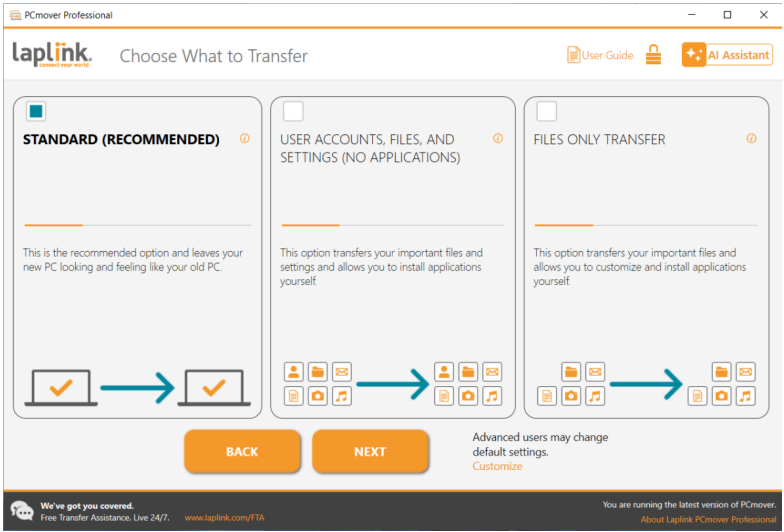
User Accounts, Files, and Settings: To transfer all user accounts, files, and settings only (no apps), choose this option and click Next. Skip step three and go to step four to complete the transfer.
Important: This option does NOT transfer applications. To transfer applications, click ‘Let Me Choose’ and make selections on what you want transferred.
Files Only Transfer: To transfer files only, choose this option and click Next. Skip step three and go to step four to complete transfer.
Important: This option does NOT transfer applications, user accounts, or settings. To transfer these, click ‘Let Me Choose’ and make selections on what you want transferred.
- Customize: To choose what applications, user accounts, files, and settings transfer, click Customize Continue to step three to make these selections.
3. Customize
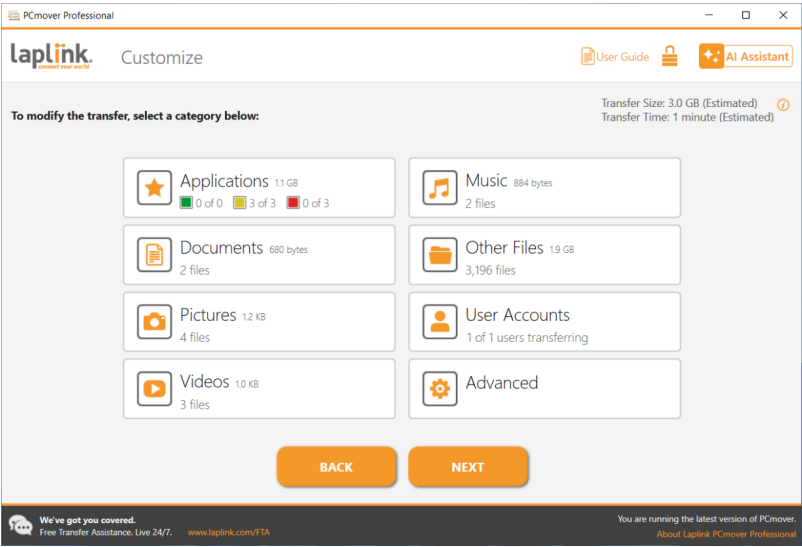
Select an item you wish to customize. Once finished with an item, you will return to this screen.
Click Next when finished customizing the transfer, and continue with step 4.
- Applications: All applications that can be transferred are selected by default. You may deselect specific applications that you don’t want transferred to the new PC. See step 3a for further instructions.
- Documents / Pictures / Videos / Music / Other Files: All folders containing files in each category are selected by default. Deselect any folders you don’t want transferred. See step 3b for further instructions.
- User Accounts: You may review and edit the settings for how user accounts will be transferred. See step 3c for further instructions.
- Advanced: You may review and edit settings for how drives and certain file types are transferred. Other custom changes can also be made to the transfer settings if needed (advanced users only). See step 3d for further instructions.
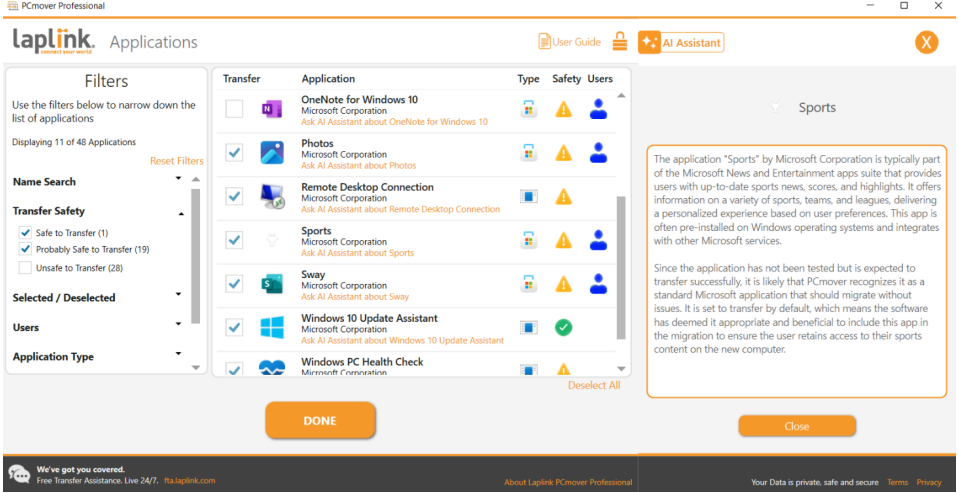
All applications that can be transferred are selected by default. You may deselect any applications that you do not wish to have transferred.
Click Done when finished.
Windows Store Apps: Any apps from the Windows Store that are installed on the Old PC can also be installed on the New PC by PCmover, so you don’t need to re-download and install them separately. The apps will transfer even though you will not see them listed on this Applications screen. Note that this only applies to any apps available on the Windows Store.
Applications list: On this screen is a list of the applications on your old computer. All applications that are likely to transfer successfully are selected by default to transfer to the new PC. You may deselect any applications that you do not wish to have transferred.
To sort by any column, click the column header.
Compatibility: The Compatibility column shows a safety rating for each application, which is an indication of how likely the application is to transfer successfully.
-
- Green check mark: The app will transfer successfully.
-
- Yellow exclamation mark: The app will probably transfer successfully.
-
- Red X: The app will NOT transfer correctly. By default, PCmover leaves all apps with this designation de-selected. It is not recommended to select any apps in this category.
Click the name of an app to see its transfer status (may transfer, will not transfer, or already exists) on the new PC.
Additionally, you can ask the Laplink AI Assistant questions about each application in the application list. Click “Ask AI Assistant about [app name]” underneath the name of the app and you will see the application-specific information pre-populated in the AI Assistant chat box. From there, you can also ask general questions about PCmover or ask for assistance setting up the transfer plan.
Click Done when finished.
Apps and programs you should not transfer:
Applications incompatible with the operating system on the new PC. Occasionally this may occur when transferring from an older operating system to a newer operating system, or when transferring from a 32-bit OS to a 64-bit OS.
- Applications already installed on the new PC.
- Applications with a trial version installed on one PC and the full version on the other PC.
IMPORTANT: Trial versions of applications should always be uninstalled from the new PC before transferring a full version of the application from the old PC.
- System tools, such as virus scanners, spyware detectors, firewall software, and desktop search utilities, which are unlikely to transfer correctly.
- Applications that are marked as unlikely to transfer successfully. These will not transfer by default, but can be selected for transfer. It is not recommended to select applications that have been identified as being unlikely to transfer.
Note for ‘User Accounts, Files, and Settings’ and ‘Files only’ transfers: Applications will not be transferred, based on your previous selection.
3b. Documents / Pictures / Videos / Music / Other Files
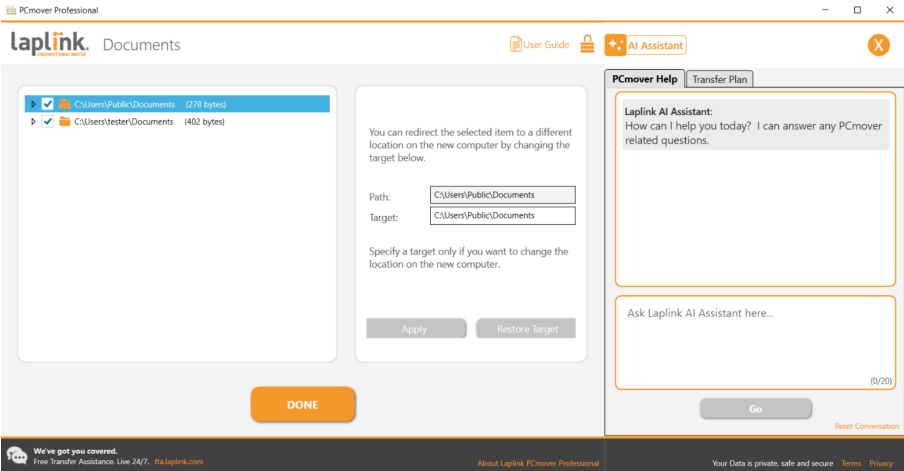
For each file type, PCmover allows you to deselect and exclude specific folders from the transfer. For instance, you do not want to transfer specific folders containing Documents, you can deselect those and exclude specific folders.
All folders that remain selected on each screen will transfer to the new PC.
Click Done on each screen when you have finished deselecting folders.
Note: To change the transfer destination for a folder, select the folder that you wish to transfer to a different location. In the ‘Path’ text field on the right, you can type in a new location for where the folder will transfer to on the new PC. You can also click Browse, and then browse to a location on the new PC to type in a new transfer location for the folder.
3c. User Accounts
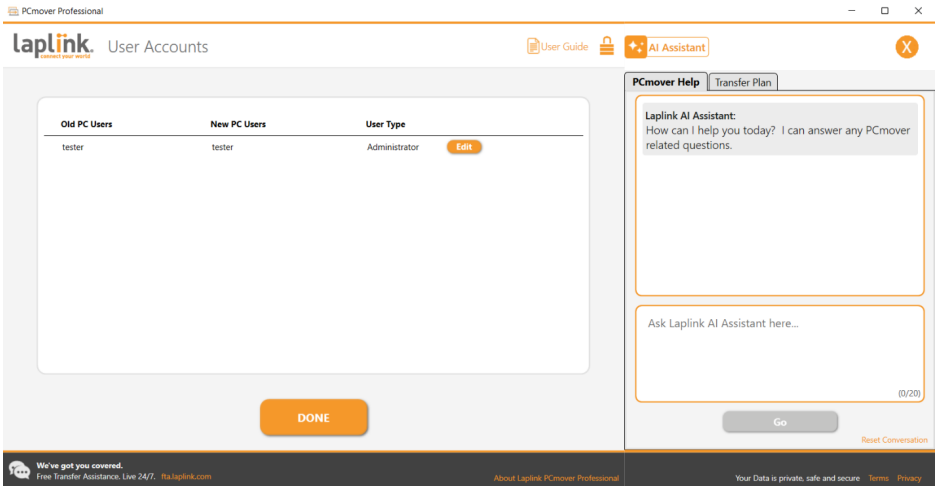
The settings and associated files for the users on your Old PC will be transferred to the user accounts on your New PC as shown in the list. If you have already established settings for the users on your New PC, the user names and passwords for the users on the new PC will also remain the same.
To transfer all users to the new PC as listed, click Done.
To modify how a user is transferred to the new PC, select the user in the list and click Edit. In the dialog box that appears, you may choose to transfer to a different user on the new PC, or you may create a new user on the new PC. You may also choose to not transfer the user at all. Click OK when finished, then click Done.
3d. Advanced
Windows Settings: Select different categories of Windows settings to transfer from the old PC as desired. Select all the categories if you want your new PC’s appearance, language, and other settings to be as close as possible to the old PC.
Drives: If the Old PC contains more disk drives than the New PC, PCmover will create a folder for each drive that does not exist on the new PC.
To modify how a drive is transferred to the New PC, click Change. In the dialog that appears, you can modify the drive and/or default destination to where it will transfer to on the New PC. You can also choose to not transfer the drive from the old PC. Click OK when finished, and then click Done.
File Filtering: To exclude certain file types from the transfer, click File Filters.
Some file types are already set up for you in this screen, such as temporary files (.tmp). These files are generally small, but if you have a large number of them, they can take up quite a bit of hard drive space. To exclude any of these file types, select the check box(es).
To exclude other file types not shown on this screen, click Add and type in the file type extension(s) of the file(s) you don’t want transferred. For instance, if you want to exclude all graphics files in .jpg format, list “*.jpg”. Click Done when finished listing file types.
Preferences and Settings: Other custom changes can be made to the transfer settings if needed. Only advanced users should modify selections in this section.
Click Done when finished making changes on the Advanced screen.
4. Start Transfer
Click Start Transfer to begin the PCmover transfer to your New PC. Depending on the speed of your connection, hardware configuration, and other factors, your transfer time may vary.
Note – Registration / Activation Failure
You must be connected to the Internet for PCmover to validate the serial number and start the transfer. If you are not connected to the Internet on either PC, you will see a pop-up window with more information. Click OK and you will be shown the Validate Serial Number screen. Click Validate Using Another PC or Device. A screen will appear with the Old Machine (PC) Name and New Machine Name, along with a Session Code.
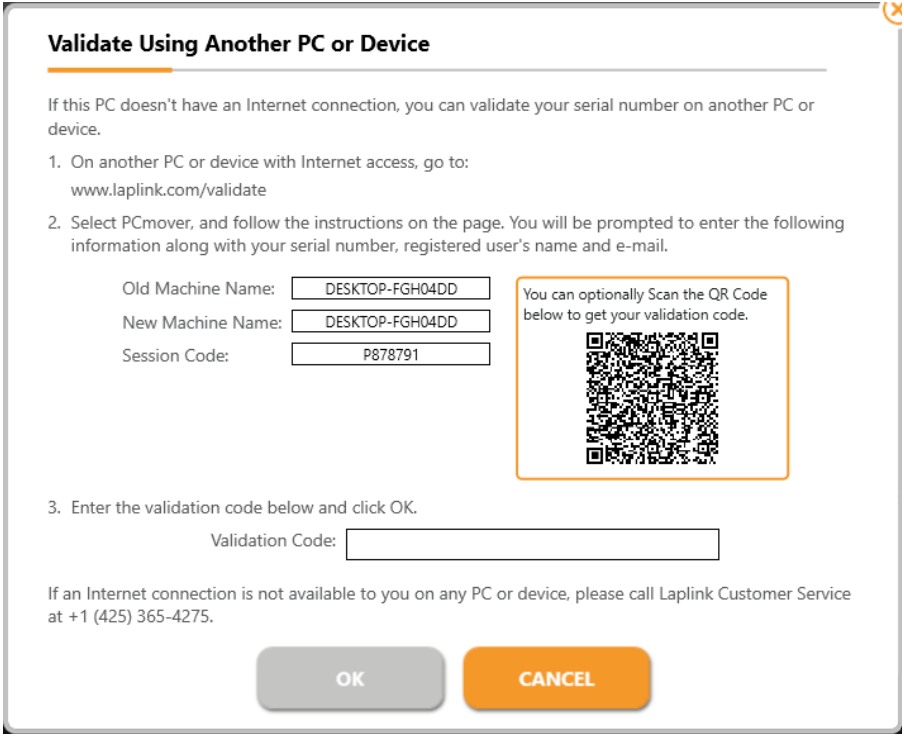
You will need the Machine Names and Session Code, along with your PCmover Serial Number, in order to obtain the Validation Code, which will be used in place of your serial number to activate the product.
On another device with Internet access, such as a phone or tablet, go to:
https://www.laplink.com/validateYou may also scan the on-screen QR code with your smartphone to get your validation code.
Follow the instructions on the page to enter the required information and obtain the Validation Code. Then, enter the Validation Code in PCmover in the Validate Using Another PC or Device screen and click OK. The serial number is validated, and your transfer will now begin.
Transferring from the Old PC to the New PC
1. Transferring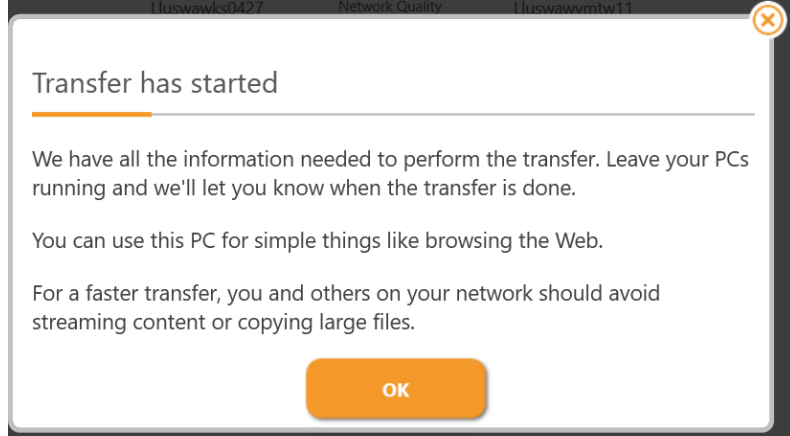
PCmover is now transferring all of your selected programs, data files and registry settings to the new PC. Click OK and allow the transfer to complete.
The length of time required to perform the transfer depends on the configuration of the computers and the amount of data to be transferred, and could be as much as several hours or more.
Note: In very rare occasions the transfer of data will not continue; if you do not see any progress for more than an hour, you should restart the transfer.
2. Transfer Complete
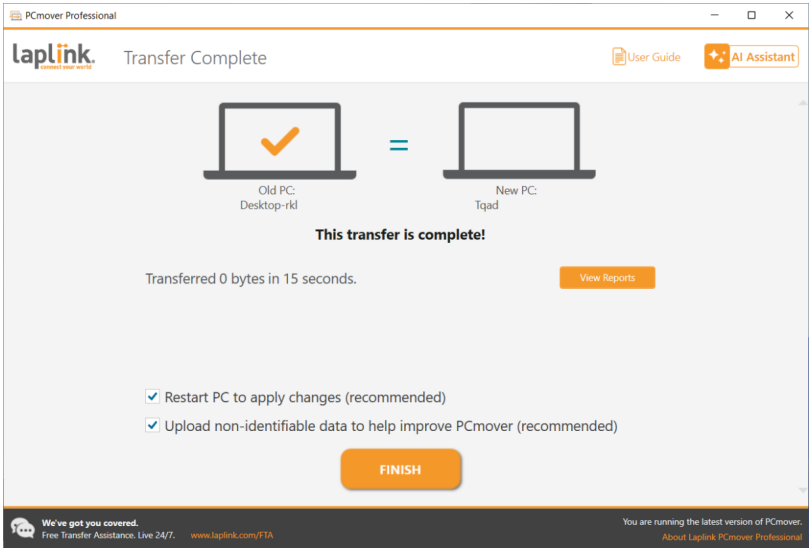
Congratulations! You have successfully transferred to your new PC.
At this point, if you used the Laplink Ethernet cable for your transfer and have a wired Internet connection, you should now unplug the Ethernet cable from your new PC and reconnect your Internet cable.
An Internet connection is required so PCmover can install Microsoft Redistributable packages required by some of your applications.
You will need to restart your new PC in order for all of the settings to take effect. Click Finish to restart automatically.
Note: To maximize system compatibility, PCmover may not transfer certain system settings as well as hardware configurations. After the transfer, the following software may have to be reinstalled or reactivated on the new PC:
- Antivirus and antispyware applications
- Hardware-specific drivers
- Files with Digital Rights Management (e.g. copy-protected music files)
If reinstallation or reactivation does not resolve problems, you may need to contact the appropriate vendor for specific instructions. For more details regarding difficulty with applications running on the new PC, please see the section ‘Helpful Hints’.
Additional AssistanceTroubleshooting
• Welcome Screen – Unable to Advance
If the Transfer Between PCs button stays gray and you see an error, please follow these steps:
- Close PCmover.
- Open Task Manager: Press the “Windows Key + X” and then press “T”.
- In Task Manager, expand your view if needed, and click the Services tab.
- Locate “PCmoverService” in the list, right-click “PCmoverService” and click Restart.
- Close Task Manager. Open PCmover. Click Transfer Between PCs and continue with the transfer setup, starting with step 2.
• Registration / Activation Failure – No Internet Access
You must be connected to the Internet for PCmover to validate the serial number and start the transfer. If you are not connected to the Internet on either PC, you will see a pop-up window with more information. Click OK and you will be shown the Validate Serial Number screen. Click Validate Using Another PC or Device. A screen will appear with the Old Machine (PC) Name and New Machine Name, along with a Session Code.
You will need the Machine Names and Session Code, along with your PCmover Serial Number, in order to obtain the Validation Code, which will be used in place of your serial number to activate the product.
On another device with Internet access, such as a phone or tablet, go to: https://www.laplink.com/validate
You may also scan the on-screen QR code with your smartphone to get your validation code.
Follow the instructions on the page to enter the required information and obtain the Validation Code. Then, enter the Validation Code in PCmover in the Validate Using Another PC or Device screen and click OK. The serial number is validated and your transfer will now begin.
• New PC Not Listed When Using Laplink Ethernet Cable or Laplink USB Cable
Once you have reached the Find Other PC screen on the Old PC when using the Laplink Ethernet cable or Laplink USB cable method of transfer, your New PC’s name should be listed on the screen.
If you do not see your New PC listed, first make sure that the Laplink cable is plugged into both computers, connecting your Old and New PCs.
Then, wait a moment for the connection between PCs to be established. If connection has not occurred after 60 seconds, click Scan Again. Select your New PC from the list if shown and click OK.
If your New PC isn’t listed after clicking Scan Again, click Cancel on both PCs to exit PCmover. Verify the Laplink Ethernet cable or Laplink USB cable is plugged into both PCs and restart PCmover.
Helpful Hints- Microsoft Outlook/Outlook Express/Windows Mail: PCmover will transfer Microsoft Outlook, Outlook Express, and Windows Mail but may not update your contacts and messages correctly. For help on updating these, please see: https://help.laplink.com/transferring-outlook-data-to-new-pc
- PCmover Reconfigurator - Change Windows Library Folders to Another Drive: PCmover Reconfigurator, a separate application included as an option with PCmover Pro, allows you to reconfigure your PC to more effectively use the drives that are installed.
Some PCs come with a small C:\ intended to run Windows and critical programs, and a secondary larger drive to store data and programs that are not typically used.
PCmover Reconfigurator moves Windows library folders (i.e., Pictures, Documents, etc.) from a small drive to a larger secondary drive in order to free up space.
If PCmover Pro detects limited drive space on the new PC, PCmover Reconfigurator will start automatically while running PCmover Pro. Otherwise, Reconfigurator can be run after the migration completes by going to the Windows Start menu > All Apps > Laplink PCmover Professional > Laplink Reconfigurator
See the Help file online for further step-by-step instructions: https://help.laplink.com/pcmover-reconfigurator
- Using Transferred Applications: If an application does not work or displays errors on the new machine, try a Repair done through the Windows Control Panel, and if that does not suffice, try uninstalling and reinstalling it. You may need to run the installation file as an Administrator. For more information on running programs as an Administrator, please check Windows Help.
- Updates for Applications: Some older applications may not work correctly after the transfer without an update, especially if the operating system on the new PC is a more recent one than on the old. If you find this to be the case, please check with the application’s manufacturer for an update.
- Programs Requiring Reactivation: Some applications with a copy-protection process known as Digital Rights Management may not function correctly after the transfer. These will probably require reactivation on the new PC, possibly a Repair done through the Windows Control Panel, and possibly reinstallation.
- Certain other applications, such as Microsoft Office, may also require reactivation.
- Music Files: Because of the copy-protection methods, music files that are copy protected may not play on the new computer without transferring the licenses for the music files. Look at the music application help files for information on transferring the licenses, or contact the music application vendor. You may also need to reinstall the music application.
- Antivirus/Antispyware Applications: Reinstall any antivirus or antispyware software. As previously stated, these types of applications are unlikely to transfer correctly.
PCmover allows you to restore your new PC to its original state before the transfer. If you wish to undo your transfer, please start PCmover on your new PC and follow the screens.
1. Welcome to PCmover
Click Undo Transfer and click Next.
2. UndoFollow the wizard screens to finish the Undo process.
Feedback and SupportWe invite your comments on how well PCmover performed. Please feel free to contact us at: feedback@laplink.com For support, live chat, and Transfer Assistance – all free 24/7, visit: https://fta.laplink.com
Laplink is fully committed to your satisfaction with PCmover. Even if you purchased PCmover as a bundle with your new PC, please do NOT contact your retailer for support. If you have any problems, please visit our website at https://contact.laplink.com for information on the various methods of obtaining support directly from Laplink.